


Integrate with Metal Building Software
Our integration with Metal Building Software allows you to quickly import hundreds of lines from Metal Building Software directly into CentralLink, bypassing several touch points where errors can be made. Less errors means less time standing on the jobsite looking for a missing part, a missing punch, or a mis-marked part.

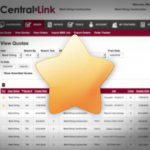
Import an entire building with one click
MBS Import lets you select the job folder. It automatically selects all items in the job with CSMI as the supplier and isolates them. Then you can choose which sections to import. Watch the image to the right to see how easy it is.
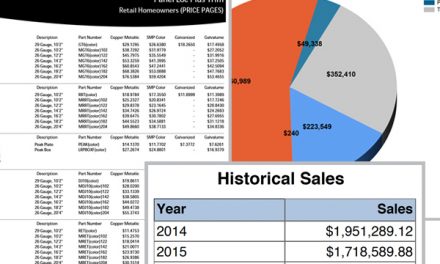
Automatically update costs in MBS
Once the configuration is complete, you can update your cost files in MBS simply a few simple clicks. This will save a ton of time during price increases, and it’s a good way to make sure you stay on top of your costs. The MBS importer reaches into your MBS costs file and replaces the value with the current price from Central States for all items that are set with CSMI as the vendor.
You don’t have to update costs if you don’t want to.
Follow the steps below to configure MBS Integration
Please follow the 9 steps below to configure MBS to integrate with CentralLink. If you need additional assistance, please call your MBS contact to ensure that MBS is properly setup. If you still have issues, please call your Central States sales representative.
Step 1 – List Central States as Supplier “CSM”
You need to make sure that Central States has the correct supplier name. The correct name for Central States is “CSM.” Please open your DT_SUPLY.siz file and make sure that Central States is listed as CSM in the categories you wish to import into CentralLink. (Not CSMI, or Central, etc)
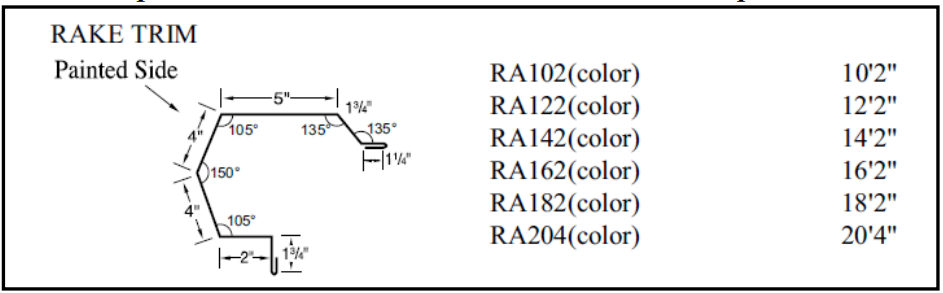
Step 2 – Match CSM Trim and Accessories Part Numbers.
Your part numbers in MBS need to line up with the part numbers that are in our catalog. Make these changes in the appropriate database files. Be sure to match these revised part numbers in the DT_COST.siz file with the CSM supplier ID. MBS limits the number of characters in a part to 8, so the CSMI part will be the first 8 letters of the part number from our catalog (leave out the color). In the example to the right, the MBS part number would read RA102 for a 10’2 rake and RA182 for an 18’2 rake. These part numbers must match in order for the import to execute correctly. There are a few items that have the same first 8 characters. This causes issues in MBS because the part numbers would not be unique. Please refer to the “Duplicate Character Addendum” for the correct part to use for MBS.
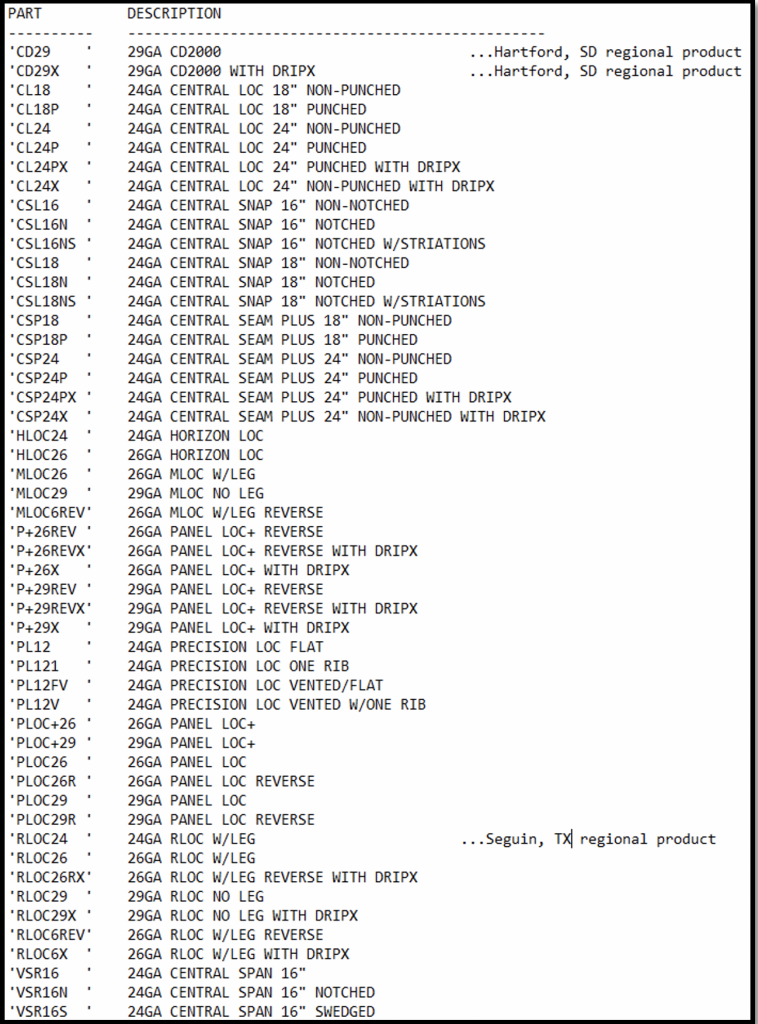
Step 3 – Match CSM Panel Part Numbers.
Match your panels part numbers in the DS_PANEL.siz file to the table to the right. Be sure to match the revised part numbers in the DT_COST.siz file with the CSM supplier ID. There are a few items that have the same first 8 characters. This causes issues in MBS because the part numbers would not be unique. Please refer to the “Duplicate Character Addendum” for the correct part to use for MBS.
Step 4 – Match CSM Purlin Part Numbers.
Update to the new Eave Strut part names. This will require changes to the eave strut database file and also the dt_membr.siz and the dt_cost.siz. Follow the table below:
Eave Strut Part Name: UUvWxYYz
Where:
- UU= Web Depth (nominal)
- v= Bottom Flange Width “A”
- W=Top Flange Width “B”
- x=Thickness: 2=12g, 4=14g, 6=16g
- YY=Shape: SU=Single Up, SD=Single Down, DU=Double Up, DD=Double Down.
- z= Approx Roof Pitch:12 Update to the new Zee and CEE part names.
This method follows a common naming convention you may already be using. However, please check to make sure. If it does need to be changed, it will require changes to the appropriate database file and also the dt_membr.siz and the dt_cost.siz.
—————————————–
Please use the following table:
Zee or Cee Part Name: UUvWWxYY
Where:
- UU = Depth of purlin (nominal)
- v = The letter “X” for the phrase “By”
- WW = Flange Leg multiplied by 10. (ex.2.5 = 25)
- x = Shape of purlin (Z or C) [D = back to back C sections]
- YY = Thickness: 12=12g, 14=14g, 16=16g
Example: Purlin,Prime,R.Zee,8” by 2.5”,16 gauge would be “8X25Z16.” Other Purlin part numbers will be the first 8 digits of the CSMI part number in the catalog. There are a few items that have the same first 8 characters. This causes issues in MBS because the part numbers would not be unique. Please refer to the “Duplicate Character Addendum” for the correct part to use for MBS. Call your CSMI sales rep or MBS contact with questions
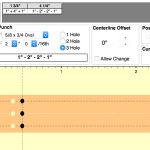
Step 5 – Confirm CSMI Punch Patterns
Your punch patterns in MBS need to match the punch patterns in our catalog. If the punch is not named correctly, CentralLink will import the punch as a special. We do allow special punches, but our systems run much smoother if our standard punches are in MBS. Please make the changes to the DT_PUNCH.siz file. Follow the table to the below:
Step 6 – Configure Shipping List
In order to automatically create the BOM_SHP.ini and SHIP.ini follow these instructions:
- Right mouse on the BOM cell, select Options
- Check the box for the following option: FILE=BOM_SHP.INI CREATE=Y
- Save the changes to the Trans folder
- Right mouse on the SHIP cell, select Options
- Check the box for the following option: FILE=SHIP.INI CREATE = Y
- Save the changes to the Trans folder
Step 7 – Configure FAB.ini Files
In order to automatically create the FAB.ini files when running the detailing, follow these instructions:
- Open the MBS.ini, and PROJECT.ini files (located in the \mbs\system\ directory)
- Add the following under [PROCESSING] sections:
- SHIP=c:\mbs\util\shop_ini.exe
- PLTSUM=c:\mbs\util\shop_ini
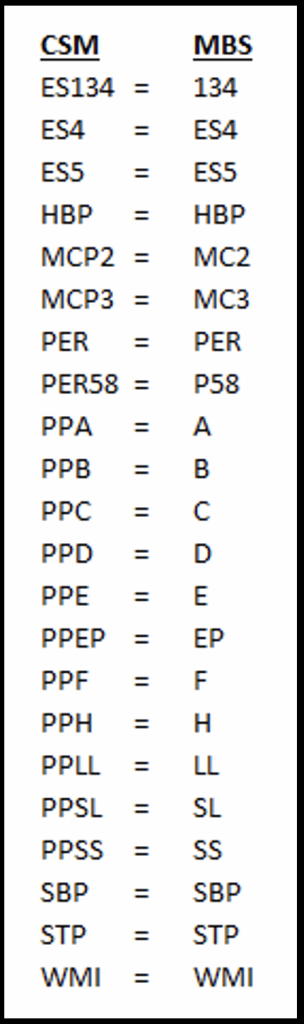
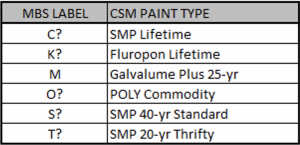
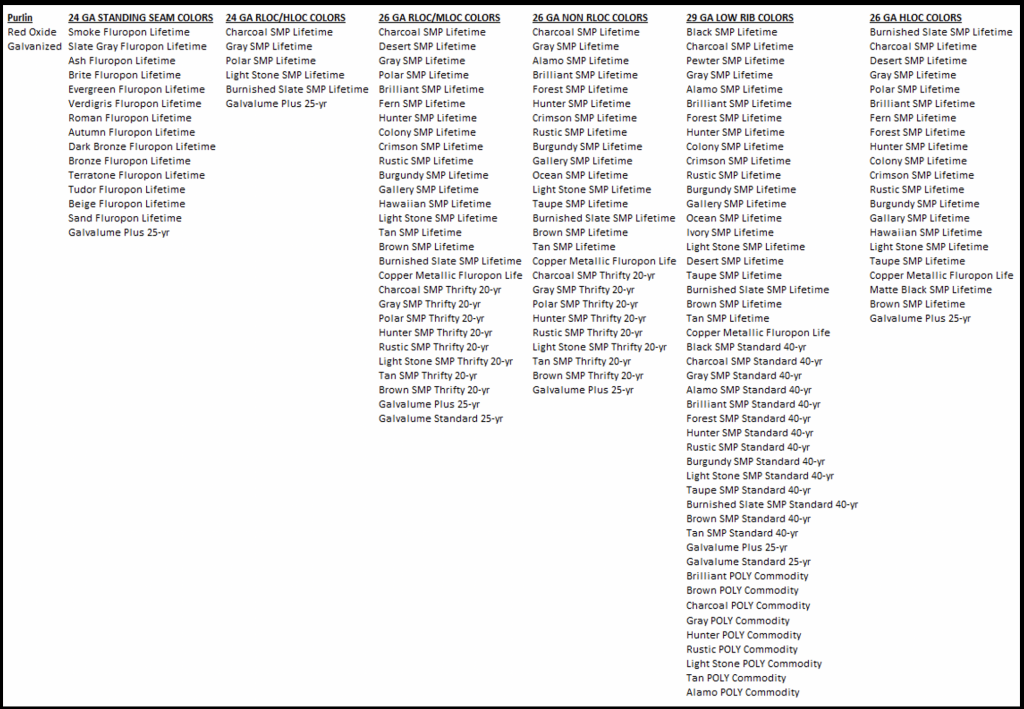
Step 8 – Configure Color Labels
In order to run the automatic pricing update, you must have your colors properly label. This should be the default settings, but please check the DT_COLOR.siz file to make sure.
Step 9 – Configure Color Descriptions
CentralLink matches up the color description, not the color code, so you must make sure that the description for each color matches the table to the right. These changes are made in the DT_COLOR.siz file. Please watch misspellings and miskeys, as these will affect importing.
Step 10 - Email us the files to run error analysis.
Normally by this point, we think that we have caught everything. But inevitably, there are a couple items that were missed, or something misspelled. It always happens. If you want, send us a couple files and we can analyze return every error you could possibly get during importing. This way we take care of all the issues up front. The files we need are:
- DT_color.siz
- DT_cost.siz
- DT_suply.siz
Email them to info@centralstatesmfg.com along with your contact information and customer ID. Or call 800-356-2733 and ask for the marketing department. We are here to help.
Download the MBS Importer in CentralLink

